Thursday, August 4, 2011

The Pinterest Challenge Part Deux: Immortalizing the Furries


Technically the Pinterest Challenge ended on Tuesday, but since the link is still open I thought I'd go ahead and add my second project. I've always loved silhouettes and have been planning to do portraits of the cats for some time now. Before I even knew Pinterest existed, I had saved this image from West Elm to my hard drive


and in my travels around Pinterest I came up with a few more examples I just loved (from here and here).


Silhouette portraits have been around for ages and were popular in American from the 1790s to the 1840s. Traditionally traveling silhouette artists would set up booths at fairs and markets and would cut their subjects out of black paper freehand and mount them on white or cream card stock. It was an inexpensive and quick way to get a likeness for those who did not have the time and money to sit for a formal painted portrait. After the camera was invented silhouette portraits declined in popularity, but the art form has carried into the 21st century and is still a fun way to create a likeness of a loved one and makes for a great graphic when purchased commercially.

For my project I decided to take advantage of all the fun scrap booking papers that are available and selected a patterned background for each cat and a coordinating solid to do the silhouette in - the space I wanted to hang my finished prints is really more suited for 4 frames in the size I had selected, and since I've only had 3 cats in my adult life (Chloe, Quincy, and Mia) I decided to include a kitten silhouette of Chloe (the other two were adopted as adults) and I did this in the reverse of her adult picture - solid back with patterned cut out.

The process was very easy. I chose photos of the cats based on the shape - it doesn't matter what the background looks like, if the lighting is good or bad or any of the other things you normally consider when evaluating photos, just make sure the shape is pleasing and that it will be pleasing in silhouette. Note the Pinterest examples above: you don't need to include the entire pet - the top dog on the left only shows the front 3/4 of the dog and the giraffe on the right is just the head and part of the neck. Make sure the details show, the head is either turned sideways or straight on, limbs either well defined or smoothly tucked under, and look for a photo that highlights your pet's personality or special features (in Quincy's case I had to have a shot of his curly tail). This photo of Chloe would NOT work because her head is turned in and the details of her face would be lost in silhouette - she'd look like a blob with legs and a strange point on her head.


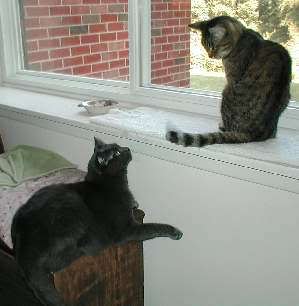
I've known since the day the photo was taken that this picture of Mia (my brown tabby) would be the one I'd someday make into a silhouette. I just loved the arch of her back as she looked down her nose at Chloe and her head was enough in profile that even though her left ear wouldn't show in silhouette, it would just look like her head was turned to a full profile.


I printed the pictures out on standard copy paper (this one I flipped first), cut around the shape to make sure I liked what it looked like and it was the right size and then glued it face down on the back of the scrapbook paper with a glue stick.


Then I just cut around the shape with sharp scissors trying to keep my cuts smooth. When it was done I used the glue stick to glue it to the matted background paper. Remember it doesn't have to be centered - I love the dachshund in my example above and how he was kept low to the ground. Finally I  put everything in (cheap-o Dollar Tree) frames and voila!

Mia Michelle

Quincy Edward
I'm still finishing up Chloe's - it took me awhile to go through and find the photos I wanted of her and now I'm losing light so rather than rush through to get it done, I'll work on finishing them up later. I'll also be printing out four photographs of them that were taken on sheets and other colorful backgrounds so they almost look like photographic versions of the silhouettes and all eight pieces will be hung as a grouping, so look for that, I don't know, sometime or another.

Tuesday, August 2, 2011

The Pinterest Challenge: Or I Can't Stop Staring at My Shelves


Have you ever finished a project and been so in love with how it turned out that you just couldn't stop running out into the room to look at it?


That's how I feel about my newly fabric backed built-ins which were inspired by these pins I'd saved to Pinterest, and thanks to the Pinterest Challenge: Summer Edition, cooked up by Sherry, Katie, Emily and Lana, I had just the motivation I needed to get this simple project done and crossed off my list.

 
(Source)                                                 (Source)

I'm on a mission to introduce more color into my living room and the natural place to start was the bookshelves, since they're a focal point of the room and the first thing I see when I walk in the front door.


I thought about painting the backs, but the shelves are fixed and I really didn't want to do all that taping and cutting in. I'm lazy that way. Then I remembered some fabric I had purchased for a different project that I changed course on. I do that a lot. Change my mind that is. And buy supplies for projects I never get around to. The fabric miraculously was the perfect aqua blue color to go with the odd greenish chairs I was making over, and the print, a small-scale Moorish tile pattern, blended with the larger scale lattice on the chairs too.


The fabric wasn't wide enough to cut lengthwise and cover both sets of shelves, so it was more economical to turn it width-wise, but I knew that would leave me a little short too. No worries, Jo-Ann still had it in stock so I grabbed another two yards (I wanted some extra for pillows too). I don't know the print name - it is part of their Keepsake Calico collection and found on the back wall along with all the other quilting fabrics and is exclusive to them.

I cut the fabric a little wider than necessary (so I thought, it's pretty close in some places) and there are little gaps behind the shelves and to the sides, so I just fed the fabric down behind and tucked in the sides using a piece of cardboard. This was so much easier than the starching I've seen people do to adhere fabric to walls like wallpaper or cutting individual panels and wrapping it around cardboard or foam core (plus it allowed me to keep the fabric in long lengths in case I ever want to do anything else with it.)


I was going to attach it with white thumbtacks, but the backing was too hard (is this were I add a "that's what she said" joke?), but I had some stick on velcro (also from the same project I'd changed my mind on) so I just stuck pieces of this in the top corners and stuck it right on the wall (side note: if you run out of mustache wax, this stuff will totally work - i.e. don't stick it on your face while you need both hands free to do something else). Because the fabric was a little short I had to pattern match and piece in a little more length. I had a little tutorial and photos planned on how to do this, but the cable for the camera that I took the pictures with is at work, so I'll do a separate post on that next week. I only lined the top five shelves - since the bottom three are pretty well covered with books, I didn't think it was necessary to do them.


So that's it, my easy, peasy project that I should have done a long time ago. So thanks ladies for the little nudge.

I'm also linking this to Thrifty Decor Chick's Before and After Party:


Related Posts Plugin for WordPress, Blogger...