Sometimes you just need a quick, easy, functional solution to something, but that doesn't mean it can't have style. Perhaps the most famous example of this is the Martha Stewart dishwashing detergent bottle
which she showed years ago and I copied until I moved to a place with a dishwasher, at which point my nearly never used dishwashing detergent went back under the sink.
Anyway, I was looking for a cute, stylish way to hold business cards on my desk and remembered the little Pyrex refrigerator box I picked up at a thrift because I loved the color but never really had any use for. The size and shape is perfect for storing the cards, and I've even put some in the lid for easier access.
Tuesday, November 30, 2010
Sunday, November 28, 2010
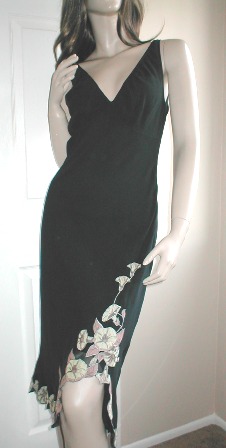
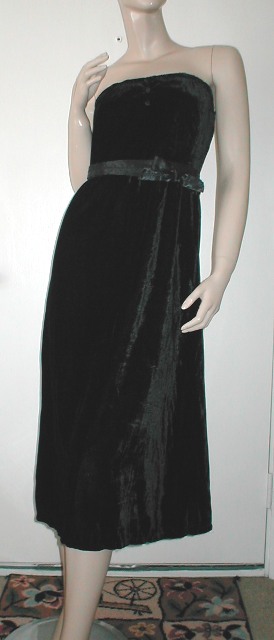
Iconic Style: The LBD
It is something nearly every woman has in her wardrobe (or should), the Little Black Dress is that go-to item that can be dressed up or down for many occasions. It is easy to wear, simple enough that it can be transformed with accessories, timeless, and seasonless.
A 1926 issue of Vogue published a picture of a calf length simple black dress designed by Coco Chanel, which they called “Chanel’s Ford,” meaning it was basic and accessible to women of all social classes. They also said it would become “a sort of uniform for women of all taste.”
Prior to the 1920s black was often reserved for mourning. During the Victorian and Edwardian eras, a widow wore several stages of mourning dress over a period of at least two years. The first year she was in deep, or full, mourning and her dress was plain black with no ornamentation. In the second year she could wear black silk and toward the end of the year embellish with black ribbon, lace, embroidery, or jet jewelry. The final six months, or “half mourning” period, allowed for muted or neutral colors with shades of purple being common. Because deaths were common in the early 20th century as a result of WWI and the Spanish flu, it became more common for women to be seen in public wearing black, leading the way to Chanel’s design and the use of black dresses in Hollywood movies, which interesting were preferred with the introduction of Technicolor because bright colors looked distorted on screen.
The LBD remained popular through the Depression because it was economical and elegant, and during WWII when textiles were rationed it became part of a standard business uniform, conservatively accessorized, for women entering the workforce for the first time.
The post-war era and conservatism of the 1950s brought the LBD around to the look of the femme fatale who was contrasted with the more wholesome housewife character by Hollywood. The introduction of synthetic fibers in this time also broadened the affordability of the dress and widened its appeal.
In the 1960s, the younger, mod generation pushed the fashion envelope with shorter versions of the dress, often with cutouts, slits, sheer fabrics and tulle. Other women of this time preferred more elegant and classic designs, such as the iconic dress designed by Givenchy for Audrey Hepburn in Breakfast at Tiffanys.
Currently the LBD runs the gamut from wrinkle-resistant knits that can be tossed in a suitcase for travel and dressed up or down, simple sheaths that can take the wearer from the boardroom to a dinner date with a simple change of accessories, and more elaborate cocktail dresses that are only trotted out after dark. While most are black, charcoal gray, chocolate brown, and nudes also work equally well and deliver the same results with a more modern twist.
Tuesday, November 23, 2010
Finding Your Inspiration
Inspiration can come from many places – magazines and catalogs, other peoples’ homes, a favorite motif, pattern or color, nature, architecture. Lately for me it has been a specific object. For my master bedroom it was this lamp, picked up at Marshall’s for $30-$40.
It is not at all my typical style – more modern than my Shabby-Chic-Meets-Pottery-Barn-in-the-90s look (which I'm slowly trying to update and modernize), and it's blue when I’ve always favored greens. Anyway, once the lamp was purchased, the Target melamine plates and Dwell Studio for Target bedding and striped 100% no-iron cotton sheets from Target joined our household.
I’m in the process of painting my old dressers dark brown to coordinate with the new dresser and the vanity in the adjoining master bath. For the bed, I’m thinking of an aqua blue palette something like this one from Pottery Barn’s teen collection (even though I am far from my teenhood). It is hard for me to commit to color because I do like to change out linens and such with the seasons.
The time has also come to tackle the mess of an office-guest-room-storage-space (it's too messy to even show you a picture. Really) and fortunately I recently scored a pair of vintage Loewenstein cane backed chairs from the thrift and some killer yellowish-green lattice print upholstery fabric that have me swooning and very inspired.
I see lots of great furniture cast-offs on my thrifting trips, and mostly I think “yeah, that would be great if I felt like doing a project, but I don’t” so these chairs must be really special to have inspired me so and they were only $11/pair – go look at what Loewensteins charges for similar chairs in their catalog. Yes, that is $670+ per chair! Score! The plan is to paint the chairs white and redo the seats with the fabric, which was only $3 for 3 yards, get a mattress for the antique brass bed I’ve been storing for years (still on the fence on what to do about the finish – it was painted brown at one time, kind of shabby chic now) and use it as a day bed with some of the extra fabric from the chairs as pillows. I shopped long and hard many years ago for a library table to use for the computer, but I wish there was a way to hide all the electronics junk without getting rid of my desk (I have an idea for that that might work involving my “just hide it all behind a curtain” strategy below – stay tuned).
The one drawback to this room is that it has no closet. I have a cheap shelving unit and dresser that are functional and in good condition, just not very inspiring, and a vanity that I’ve had basically all of my life that I’m not willing to part with and that will serve well for a sewing table, so the plan for right now is to line all of those up along the wall with the “big ugly mirror I haven’t been able to work around” attached to it and then use IKEA’s Kvartal track system and panels to just hide it all. Eventually I’d love to do a built-in custom system. I’ve physically rearranged the room 2 or 3 times in the past year and finally sat down and drew out a measured floor plan with furniture cut-outs so I could rearrange on paper and I think I’m going to do one more rearrange and hopefully be done. Fortunately I don’t think I have to move and rewire computer equipment this time. Anyway, stay tuned, maybe in a year I’ll have this done. I’m hoping the mood board below helps speed me along though, ‘cause I really am sick of this mess.
Caned Toboggan Arm Chair from mcguirefurniture.com
$2,250
Gandia Blasco Modern Flower Rug Pistachio Green from Modern Rugs
$2,050
Farmer's Leg Table from onlineamishfurniture.com
$937.20
Waldorf Bed from Kids Furniture Mart
$369
Sliding Window & Door Treatment in Java Natural Finish - Panel Track from ivgStores
$72.12
Retro Accent Lamp - Guacamole from Desk Lamps
$39.98
Urban Stripe Fabric from gigglebrushdesigns.com
$26
Camea Lidded Storage Baskets - Small Lidded Storage Basket from Crate and Barrel
$14.95
Monday, November 22, 2010
Thrifty Lamp Makeover
[caption id="attachment_199" align="aligncenter" width="500" caption="Thrifty Lamp Before"]
[/caption]You may remember the $3.75 lamp I posted a few weeks ago. It was brass and medium toned wood with a burlap drum shade. Well, I'm happy to announce, its transformation is complete! I took it apart, taped it off and spray painted the brass parts silver with a metallic paint. I sanded the base parts first with a sanding sponge which gave me a nice brushed finish but because I'm lazy did not sand the smaller bits, which came out smoother. I think I like the brushed look best. It took several coats of paint to coat everything - remember, with paint, many light layers are better than one heavy one.
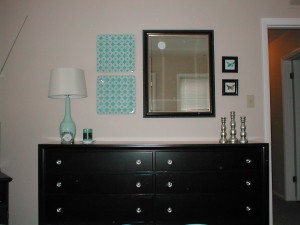
I gave the spray paint a few days to dry (one is probably enough, that is just how long it took me to get back to it) and then taped off the silver and with a cheapy foam brush painted the wood with some Ralph Lauren Edwardian Burgundy I had left from this dresser makeover. Once the paint was dry (sort of, I was getting excited at this point) I put in the new cord, which is super easy to do (just follow the directions on the package or look for a reputable site online with directions). I had a white one on hand from another project I haven't gotten to yet, I may change it out for a dark one eventually as I plan to paint the dresser this lamp is sitting on dark someday.
In between the spray painting stage and the wood painting stage I worked on the shade. I had a nice piece of brown grosgrain ribbon that came around the Dwell Studio for Target quilt I'd purchased earlier in the year so I just wrapped that around the top and tied it in a bow. It seems to be holding, but I could add a dot of hot glue if needed.
So here it is, my "new" lamp, which cost me under $10.
Friday, November 19, 2010
Cheap DIY Art for the Dining Room
I saw this idea years ago and have had is squirreled away in the recesses of my mind waiting for a chance to use it. Finally, I've come up with the perfect spot! Basic materials you need are a picture frame or two, some backing fabric, some silverware, and a glue gun. My frames are antiques that belonged to my grandmother, but more modern frames would work too. My original idea for background fabric was velvet, but Joann's did not have the taupe I was looking for. I wandered around the store for awhile trying to come up with something else, when I stumbled upon burlap in the back corner (talk about your 180-degree turns - velvet, burlap, velvet, burlap). It was cheap (about $3/yard I think and I only needed 1/2 yard), the color I wanted, and I thought would look great. A nice patterned fabric would also probably work too or a tone on tone texture). The silverware is a mix of my baby fork and spoon and some thrift store purchases - it is all silver plated, the forks I researched when I bought and I think they are 19th century.
I removed the glass and the prints from my frames and wrapped the wooden backings in the burlap. The wood was pretty fragile so I just used some painters tape to hold it so I wouldn't stress it, if you're working with a sturdier frame, hot glue or staples would probably do the trick. Once I had my backgrounds back in the frame and taped down, I just hot glued the silverware to the fabric. This should make it pretty easy to remove when the silver needs to be polished. I hung my new art one on top of the other and voila! Instant, easy, and cheap artwork.
Along similar lines, Real Simple just featured this jewelry display, which I also really like. In this case, pieces are just pinned to a backing, which is probably some sort of foam core or homosote under the fabric, and the display can change daily as you add and remove different pieces. I'll have to keep my eyes open for a large frame to pull something like this off.
Sunday, November 7, 2010
Thrifty Finds
The other night on my way to vote I passed by a thrift store that has a huge book department, and having just seen a cool Halloween spread in a magazine based on Poe’s The Raven that I’m obsessing over for next year, I decided to make a quick pit stop to see if I could find any old Poe books. No luck there, but for $25 and change, I did snag quite a few home goodies.
WOODEN LAMP with BURLAP SHADE – I was initially drawn to the nice drum shape of the shade, but the lamp itself wasn’t bad either. I really need lighting in my living room, but I don’t think it will work there because I don’t have place for an end table, so it will either go in the master bedroom or the office. For now I’m considering spray painting the brass parts silver and painting the wood dark brown. I may add some trim to the shade too. Please note, I recommend rewiring any secondhand lamps – it is easy and inexpensive to do. This was $3.75.
SILVER TRAY - The oval silvertone tray is a little dinged up, but it is nice and heavy, not too ornate and has a nice patina too it – more pewter-ish than silver. I thought it would look great with pillar candles and Christmas ornaments piled on it either as a centerpiece or in my fireplace, like this example from Southern Living. This was $2.25. I also picked up a round, more ornate tray the next day. This was a splurge at $6, but I've been looking for a nice heavy one and I really liked the piercing on the side. This has found a place on my dresser corraling candlesticks and a clock.
[caption id="attachment_190" align="aligncenter" width="400" caption="This arrangement from Southern Living may inspire my use of the silver tray."][/caption]
WOODEN CANDLESTICKS – These are signed on the bottom, I think it says “Graves” as in architect and designer Michael Graves. I loved their shape and smooth modern form. They were $2.25/pair.
GLASS DECANTER – I have another of these in a similar style (that I’ve since seen in other sources identified as “mid-century Danish” and Dansk) and I thought they’d look nice grouped together. It also mirrors the shape of the above-mentioned candlesticks so maybe they’ll all end up together in some sort of tableaux. This was $1.15.
ANGEL IN A JAR – Someone at Hallmark thought it would be funny to imprison this poor angel in a glass jar, although it is unclear what she ever did to them. Together the combo isn’t working for me, so I plan to set her free and use the apothecary jar in some other way, maybe for soaps in the bathroom, or seasonally at Christmas and Halloween. The angel on her own isn’t bad either and may find her way into my Christmas décor. This was a major score at $2.25 – earlier in the day I saw similar apothecary jars at the craft store for $15 (and I think this was their sale price). I picked up the smaller one the next day (funny how you start to find things in multiples like this when you start looking) for .90 cents.
[caption id="attachment_192" align="aligncenter" width="383" caption="I may use the apothecary jar to display soaps in my bathroom like they\'ve done at Pottery Barn."][/caption]
[caption id="attachment_193" align="aligncenter" width="263" caption="Martha Stewart creates mad scientist specimen jars for Halloween."][/caption]
SILVERPLATE CHRISTMAS-THEME PHOTO HOLDERS - These little photo holders are great for their intended purpose, but are also great on a buffet with little cards identifying the food choices. They were just $3.00.
Subscribe to:
Posts (Atom)