Today is the third day of my three bookshelves, three-day project. The first day I primed all three and painted the small wooden one in the hall bath. The second day I waxed and styled the bathroom bookcase and did most of the painting on the two white laminate cases. Because I'd used a roller on these, the paint was spread pretty thin, so today I touched up some thin spots - they really could use another coat, but I'm almost out of paint and didn't want to go buy more at this point. Putting the shelves back in resulted in some scrapes to the inside of my newly painted surface, so I touched these up too. Because I am planning to do a final coat at some point, I cheated and did not wax these yet. So I cleaned up, moved the shelves back to where they belonged and put stuff back on them. For now I just pretty much did a tidied up version of what was already on them - I need to do major cleaning out and organizing in the coming months and may change things around then, but today was devoted to putting away Christmas and I just didn't want to drag more stuff out.
So here they are, all three sets of completed shelves:
And here is what they looked like when I started:
So not bad for three free sets of shelves, a free quart of green paint, and leftover white and tan paint. My only real expenses were the Zinsser primer, roller set and roller covers which were under $20.
Wednesday, December 29, 2010
Tuesday, December 28, 2010
Bookshelf Redo - Day 2
So, today is day two of my project to make over 3 small sets of bookcases. Yesterday I primed everything and painted one of the cases with Glidden's Soothing Green Tea, a light yellowish green. Today I worked on the two laminate sets. They are being painted to match my trim, which is Valspar's Woodlawn Lace, from their National Trust Collection. Most of the colors in this collection are based on historic properties - this one being Woodlawn, which was once part of George Washington's Mount Vernon. I am in love with this color - it looks fabulous in every light: crisp and clean during the day, soft and warm at night, and if I wake up during the night it absolutely glows from the light outside.
The backs of the bookcases were done in Valspar's Antique, which is part of their Waverly collection. This is the color of all of my walls except the kitchen and laundry/pantry. I was planning on saving this for wall touchups and using an old can of Martha Stewart's Light Cocoa, which is very similar, but I couldn't get the can open.
While the roller was an easy way to paint the outsides and shelves of the bookcases, I did find I had to do about three coats to really get coverage, and I still have a few spots to touch up. It did also require some sanding in between coats. I did the backs with a brush and it was much faster, if not as smooth of a finish.
While I was waiting for the paint to dry on these, I applied the paste wax to the green bookcase which was painted yesterday. I like to use what is sometimes called Bowling Alley Wax (for reasons I can guess) or Butcher's Wax (for reasons I have no idea) which gives a nice hard, water resistant finish and a pretty sheen.
To apply it, I just use a paper towel (cheese cloth actually works well too) to scoop some out and smear it on the piece. It is stinky, so ideally (i.e. do as I say, not as I do) you should do this in a well-ventilated place, and the can warns harmful or fatal if swallowed, so don't eat it or let your kid or pet near it. After smearing on a light layer, let it dry for awhile and then buff it off with an old towel or t-shirt. If it seems sticky while you're wiping it off, you need to let it dry a little longer. Once it is buffed off, your piece will have a nice smooth feel and sheen.
Since I wasn't planning to do much different in styling this piece, I went ahead and put the stuff back on it. So here it is again before:
And after:
Monday, December 27, 2010
3 Bookshelves, 3 Days
I decided to take advantage of some much needed time off of work to tackle a few projects I've been putting off forever, namely painting up the three trash picked bookshelves I have hanging around here. My three day timeline includes two days of priming and painting and the third day to wax the cured paint and style the shelves. Luckily the day-after-Christmas snowstorm we got hit with played perfectly into my plans - I'm not going out in that no way, no how.
So today is day one. Let me introduce you to myvictims shelves:
This first cutie set is actually made from real wood. It's quite scratched on top and an ugly reddish/orangish brown color, but otherwise a nice compact size. It lives in thecats' hall bathroom and is perect for storing extra towels, toilet paper, books on cats, cat toys, and random cat decor (I plan on becoming a crazy cat lady, complete with theme sweaters, about 20 years from now.)
The next two shelves are a matched pair of laminate complete with cardboard backing. They're also perfectly sized for where they live, one in the dining room in the space between the kitchen door and the wall, which is used to hold barware, dishes, and decorative items, and the other in the master bedroom between the bathroom and closet doors, where it holds a few books, my tax files, and some decorative items.
First I gathered my supplies: A 4" cabinet and door roller set, a canvas dropcloth, foamy brush, angled paint brush, wood glue (to repair the trim on the front of one of the shelves), paint, sanding sponge, and primer. On the recommendation of Kate from Centsational Girl I picked up the Zinsser oil based primer for the laminate bookcases since it is supposed to stick to anything, and it does.
I sanded the top of the wooden bookcase pretty well since it had some scratches. My wood filler was dried out, so I used a very, very thin coat of plaster spackle to fill in the last little bit and it seems to have worked pretty well. The primer says "no sanding necessary" so I did not sand the rest of the wooden piece, but did go over the laminate ones very lightly (I hate sanding. Detest.). The roller worked really well on the outsides of the bookcases, was a little more difficult on the insides, especially the wooden one whose shelves were not removeable. I used an old foamy brush to get into the corners. I was also working in a really small space which didn't help matters any. The primer dried really quickly (can says an hour, I took a lunch break in there so left it a bit longer).
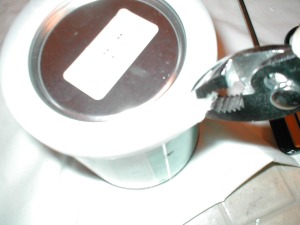
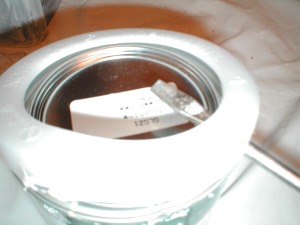
I tossed the roller after finishing with the primer because Ihate cleaning them did not have the mineral spirits to clean oil paint. Since it was windy as heck and the roads were snow covered, a trip to Home Depot, which is literally across the street, was not in the cards for additional rollers. The interior of the wooden case I decided was more easily tackled with the brush anyway, so I broke out my can of Glidden Soothing Green Tea that I had gotten free about 2 years ago when they did a website promotion. The can was sealed with a plastic ring called a NormLock Seal to keep it from leaking when shipped. I didn't know what it was for or how to get it off, so I started with a websearch. I nearly got a virus, and could have learned how to hack my husband's cell phone or "adult" websites if I'd wanted (I swear my search terms were "opening normlock seal"), but no instructions for getting this plastic ring off my paint can. I found directions for removing a different brand of seal with pliers, so I started there and added a screwdriver when I'd pryed it up enough. Don't worry about destroying it, you're not going to reuse it. This was my main question when starting out - I wasn't sure if it was supposed to go back on the can to scrape the brush against to keep from gooping paint all over the can or what, but no, it is just to seal it for shipping.
So with my paint can open I could finally begin painting! I had planned to do just the inside, and wait until I could get out for rollers to finish up the outside, but once I started I just kept going and did the whole thing. So here is the result.
I'll tackle the laminate shelves tomorrow when I can get out for more rollers. They will both be painted white to match my trim with the back panels in tan to match (or close to match) the walls.
So today is day one. Let me introduce you to my
This first cutie set is actually made from real wood. It's quite scratched on top and an ugly reddish/orangish brown color, but otherwise a nice compact size. It lives in the
The next two shelves are a matched pair of laminate complete with cardboard backing. They're also perfectly sized for where they live, one in the dining room in the space between the kitchen door and the wall, which is used to hold barware, dishes, and decorative items, and the other in the master bedroom between the bathroom and closet doors, where it holds a few books, my tax files, and some decorative items.
First I gathered my supplies: A 4" cabinet and door roller set, a canvas dropcloth, foamy brush, angled paint brush, wood glue (to repair the trim on the front of one of the shelves), paint, sanding sponge, and primer. On the recommendation of Kate from Centsational Girl I picked up the Zinsser oil based primer for the laminate bookcases since it is supposed to stick to anything, and it does.
I sanded the top of the wooden bookcase pretty well since it had some scratches. My wood filler was dried out, so I used a very, very thin coat of plaster spackle to fill in the last little bit and it seems to have worked pretty well. The primer says "no sanding necessary" so I did not sand the rest of the wooden piece, but did go over the laminate ones very lightly (I hate sanding. Detest.). The roller worked really well on the outsides of the bookcases, was a little more difficult on the insides, especially the wooden one whose shelves were not removeable. I used an old foamy brush to get into the corners. I was also working in a really small space which didn't help matters any. The primer dried really quickly (can says an hour, I took a lunch break in there so left it a bit longer).
I tossed the roller after finishing with the primer because I
So with my paint can open I could finally begin painting! I had planned to do just the inside, and wait until I could get out for rollers to finish up the outside, but once I started I just kept going and did the whole thing. So here is the result.
I'll tackle the laminate shelves tomorrow when I can get out for more rollers. They will both be painted white to match my trim with the back panels in tan to match (or close to match) the walls.
Wednesday, December 22, 2010
Pink and Gold Holiday Table
I've been on a pink and gold kick this holiday season. If I had done a tree, I was planning on this color scheme, but alas, there was no time or space for a tree this year, so I decided to unleash my glittery, glamorous ambitions on my tablescape. You may remember the "Angel in a Jar" decoration from my Thrifty Finds post last month. I was unsuccessful in freeing her from her prison, so I used her as is, with just the addition of a faux pearl necklace (I have yards of faux pearl garland around somewhere, but since I couldn't find it, just raided my jewelry box). I placed her on a small square beveled glass mirror with a gold frame (thrifted, $3.35), pulled out my Duralex Piccardy glasses in three different sizes to add to the centerpiece, along with some ornaments and more faux pearls from the jewelry box.
My place settlings are gold leaf chargers topped with ironstone plates (I'm obsessed with white dishes) and pink glass rim soup plates. On top of these I've added another Duralex glass (I pick these up in the thrifts whenever I can find them) with a pink ornament inside and a glittery white snowflake off to the side. Under it all I've used a green tablecloth and a natural runner, which I think keeps the whole from being too precious. I've staggered silver candlesticks and two frosted hurricanes with glitter snowflakes on them down the runner. After I took the photo, I also added two glittery reindeer from Dollar Tree.
[caption id="attachment_278" align="aligncenter" width="500" caption="I like to match my decor to my cat!"][/caption]
As you can see, Quincy, who has green eyes, and a pink nose and pads on his feet, matches the decor perfectly. Maybe next year I'll get him some angel wings and a pedestal and he can be the centerpiece. You know, kinda like when stores have "live" mannequins in their windows sometimes.
With the exception of the runner, which I think I got at Marshall's years ago, one set of the candlesticks, which were my grandmothers, and the hurricanes which were a gift, everything else on the table was thrifted and probably less than $20 all together, with many of the elements being things I can use at other times of the year and in different color schemes. So I hope you've enjoyed my table, and in case you were wondering, no I don't ever actually eat at it. And the cats aren't really ever allowed up there.
Subscribe to:
Posts (Atom)