Wednesday, July 27, 2011

Viva la France!


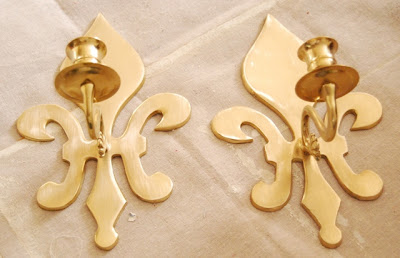
Yes, I'm well aware that Bastille Day has come and gone, but with the heat wave we were experiencing here over the last few weeks, getting outside to finish up a spray paint project just wasn't going to happen. And the project I needed to finish was my fleur de lis sconces. They were a thrift store purchase (of course) - I think $3 for the pair, maybe $4 - as a self-proclaimed Francophile, I couldn't leave "ces bébés" behind. They were shiny brass and the arms were loose (no biggie to tighten up with the screw on the back).


After scuffing them up with sand paper, I put on a coat or two of Rustoleum's Heirloom White,


but decided it was too bright and shiny to go alongside the antique white picture frame I planned to flank with them, so I changed course and went with the oil rubbed bronze I had left over from the sunflower mirror makeover.

So here they are, finished and hung. One down, 19 to go.


Pssst. I'm linking up to Between Naps on the Porch's Metamorphosis Monday blog party. Hope on over and take a look at all the inspiring projects.


And the List Goes On....

I mentioned here how I have this crazy-long list of half finished projects, projects I've bought the supplies for and haven't started, projects I have in my head that haven't gotten beyond the planning stage. Along with that list I have a list just as long as to what my excuse is. In the name of my own sanity and perhaps even getting a bit organized to get some of this stuff done, I'm going to do a brain dump. Yep, right here, the entire contents the crafty project corner of my brain.

1. Finish spray painting and hang fleur de lis sconces (ha, this is a cheat, I finished painting them last night and only need to hang).


2. Pet silhouette portraits - have most of the scrapbook paper, small change in inspiration need to get a few more patterned sheets; need some black spray paint to fix up the cheap-o frames. Hoping to get this done in time for the Pinterest Challenge being hosted by Sherry of Young House Love, Katie of Bower Power, and two of their blog colleagues.

3. Line back of LR bookshelves in fabric - have fabric purchased for another project I've changed my mind on; just need to cut it and get it up. Might also try to get this done in time for the Pinterest Challenge.


4. Spray paint Lowenstein caned chairs I first mentioned here - did the upholstery on them awhile ago; dreading dealing with the peeling laquer on the legs.


5. Spray paint ice cream parlor chairs for balcony and plant planters that go in them - you can see this project here when I first added the planters to replace the missing seats last year but I still need to get them painted.


6. Construct canopy frame for balcony - this is still in the planning stages - I have a rough sketch and a good idea in my head, need to figure on the measurements and supply list - hate the math projects

7. Sew the canopy for above frame - have the fabric, need to hook up the VCR and rewatch the video that came with my sewing machine on how to pattern match - I used this tutorial to match a toile pattern on my Christmas tree skirt and it came out fabulous, you can't see the seam at all. Also need some dowels, hooks and other hardware.

8. Paint or wallpaper the toe kick beneath the MBath vanity and add furniture legs - have everything except maybe stain for the legs (might also just spray paint them); need to decide which way I want to go.


9. Dye living room curtains - does nobody make a decent peacock blue dye?

10. Dye bathroom towels to match Smurfy the candlestick and hide bleached out spots (who knew whitening toothpaste would do such a thing - duh).

11. Hem raspberry and white linen dresses before linen wearing season is over. They're pressed and pinned, just need to get the sewing machine threaded up ... and done.

12. Get thin wooden trim to glue around frameless, magnetic closure china cabinet doors to make them look like framed doors. Paint with leftover trim paint.


13. Paint and rewire? china cabinet light fixture.

14. Figure out china cabinet shelving situation (sticking with the glass or change to wood) and get shelves styled.

15. Make some pillows for outside - have fabric, need to find the old pillow forms I know I have around here somewhere.


16. Recover sofa pillows in new color scheme - have some of the fabric; need to order one other for pillows and to make padded top for trunk/coffee table.

17. Make skirt/slipcover for trunk/coffee table so it looks more like an ottoman.

18. Do something (anything) with the kitchen ceiling fan/light fixture. I changed out the shade awhile ago, but something must be done about it's brassy-classy(less)-ness. Also want to paint the blades, but not sure yet what color.


19. Paint or something kitchen hardware so it matches (hinges are antique brass, which I can live with, knobs/handles are shiny brass which I cannot live with). There are 212 screws involved in this project. I counted. And I am not looking forward to unscrewing and rescrewing them all. At all.

20. Finish painting MB curtain rods and figure out what to do about blinds/shades. When the siding crew showed up last summer I threw up emergency curtains (old vinyl blinds came down when the windows were replaced and were donated to the local ReStore) because the windows were naked and I had only gotten as far as painting the brackets and finials. Problem is the Ralph Lauren Edwardian Burgundy paint sample I was using is almost all (I painted a small chest of drawers with it, here) and Home Depot doesn't carry the RL paints anymore. I understand they can color match for you, but wonder if they will do it for just a sample? I also need some brown paint in our "official" community brown to do some exterior door trim and touch ups so I may just go with that and if the color is too off from the finials/brackets, just repaint those as well.


Well, I think 20 half-done, sort of started, supplies at least purchased projects is a good stopping point. I still have some other long-range goals like wallpapering the bathroom ceiling, adding architecture to the hallway, redoing some of my bedroom furniture, maybe adding crown moulding to the bed and bathrooms, and getting my office straightened out and organized, but that list could go on for days.

Thursday, July 21, 2011

Undercover: How to Turn Milk Crates into a Side Table for the Patio


I have a list about a mile long of unfinished projects: projects I’ve bought some or all of the materials for and haven’t even started; projects I started and need something or another to finish; projects I’m just thinking about and planning. So earlier this month I decided to get to work and get at least one thing done that I had supplies on hand for. Does anyone remember making stacked “milk crate” furniture in college? Yeah, I still have some of those crates around. Don’t worry, it’s not in my living room or anything, but I had two crates in storage that were just the right size for a little table out on my balcony.


Problem is, they looked like two old stacked milk crates. I while back I bought some burlap to make a cover for them. I took some measurements to get an idea of what size pieces I needed to use, added in for seam allowances, and then just kinda rounded off when it came time to putting it all together. I’m visual so I made a little drawing which I forgot to photograph. Trust me, it is no work of art, but I was able to figure out my measurements from it.

I chose to do a somewhat tailored cover with corner pleats. To make the pleat, you basically need 3x the length of fabric as the size of the pleat – so for instance for a 4” pleat, you need 12” of fabric to account for folding the fabric in and back out again. I used a dishtowel and a tape measure to practice the fold and figure out the amount of extra fabric – I’m very scientific that way. No really, this heavy-duty engineering stuff only really makes any sense to me if I can see it. So 12” of fabric for each corner times 4 corners, plus the circumference around the crate, plus seam allowances meant I needed about 106” of fabric for around the table. I think I bought 2 yards of fabric, so I had to seam it together to get to the 106”. For length, I just cut the fabric through the middle long ways and that gave me enough length for seam allowances plus some overhang for a more slouchy look. I used the selvages for the hem so I didn’t have to sew one. I sewed the 106” into a circle, cut out a roughly 13 ½” square piece for the top and then pin fit the skirt to the top. I started by pinning one of the seams of the skirt to the center of one of the edges of the top. Then I pinned the opposite side of the skirt to the center of the opposite side of the top. I mostly just eyeballed and pulled the skirt out to find the centers – I guess you could measure if that is your thing. Then I did the other two opposite sides the same way.


Once I had the center point of each side of the top pinned to the center point of each side of the skirt I just continued pinning down each side until I got to the corner.


When I was finished, I had a “bubble” of extra fabric at each corner which I just folded over in each direction to make the pleat – remember I was working inside out at this point, although burlap doesn’t have a right or a wrong side – and pinned into place.


Then I went to the sewing machine and started sewing along my pin lines.

Two lessons learned: pin perpendicular to the edge of the fabric, not parallel, and use pins with large heads. I actually knew the first from regular sewing from a pattern, but this was the first time I’d pin-fit anything and it seemed easier to almost create the seam line with the pins – it is hard to get the pins out as you sew up to them when you pin like this. The second point is specific to the burlap – the small headed pins kept slipping down into the large weave of the burlap and were hard to get out or they went all the way through and didn’t do their job.

Burlap also doesn’t iron well and it is hard to tell where you did and where you didn’t iron. Do I anyway, it does make a subtle difference in getting the seams to lay better. Where my seams look a little wonky is actually just bad ironing and the rain has smoothed it out a bit now too.


So overall, I think this is a vast improvement over two tacky stacked milk crates. Ignore on my tacky plastic chairs – they were cheap, the color I wanted, made in the US, and are 100% recyclable. I have no idea how this will hold up to the elements - we've had some rain and a ton of hottness here lately and all seems A-OK. I think if I were to do it again I’d chose a lighter weight fabric, but overall I like the effect and I’m pretty amazed my corners came out in the right spot and don’t look too bad. I had considered doing a navy piping at the juncture of the top and skirt, but considering the bulk of the fabric, am glad I opted not to this time around. All told I spent maybe $6 on the burlap. And on to the next project.


Related Posts Plugin for WordPress, Blogger...