Showing posts with label living room. Show all posts

Wednesday, July 18, 2012

$20 Storage - Cha Ching

I recently lucked into the best deal on a gorgeous server to replace my beat up old Bombay Co. console table. I used to have it under a window, so the cats did a number on it while observing the local wildlife. Truth be told, while I loved the design of the piece, it was never very practical in terms of storage. At the very least I pined for a nice shelf underneath to stack baskets and maybe display a few things I had nowhere to store decorative objects.


I sort of fixed the problem with a large Irish linen table cloth and a smaller topper - it covered the scratches and I could stuff a few things in among the legs for hidden storage. It was one of those works for now kind of solutions, but I wasn't going out of my way to look for a replacement either.


Then a recent trip to the Salvation Army turned up this beauty. Priced at $40. On half-price day. Yes, that's right, $20 for this gorgeous, made in North Carolina by the Sherrill Furniture Co., buffet server. The size was perfect, so I didn't need to move any of the gallery wall.


The upper drawers house some of my eBay packing supplies and the lower drawers and cabinets house inventory. I was able to empty out 3 heavy, hard-to-manage, storage totes into this thing. And look at how pretty the hardware is too. The finish is in relatively good condition, a few sticky spots I just covered with objets d'art need to work on, and I love the color so no painting projects in the foreseeable future either.


Any favorite rescued furniture in  your life right now?


Saturday, March 31, 2012

Fireplace Makeover Phase I and Free Paint for Phase II

Earlier this month I went to change out the arrangement in my fireplace and decided I couldn't stand it one.second.longer. 


It was filthy when I moved in and the cleaner we used totally remove most of the paint on the metal side panels. The doors and rust and the bottom grate had striped paint and rust from where Boy Cat pee'd on it. The faux brick back and floor were cracked and stained. The handles were ugly. While pulling out the fall/winter arrangement a bunch more soot fell down out of the chimney. Just all around yuck. 


I ran right out and got some high heat primer and tapped off the doors and the wall with newspapers and a plastic tarp. I vacuumed out the soot and I sanded down the rusty spots and removed the grates to paint outside.


After getting everything nice and primed, I realized I wasn't going to be able to find the high heat paint in anything but black in local stores, so I ordered the Stove Bright Charcoal from a vendor on Amazon.


Not the cheapest way to get paint, but I had some credits from my Amazon credit card and I really didn't want the flat black. It's a subtle difference and the color is darker then the cap, which I expected from reading some of the reviews. The lighting is making the finished job look a little spotty, but in real life the coverage is nice and even.


I had one small scare when I removed the newspaper from the glass and realized I hadn't taped off the inside of the small side panels. Ooops. But it removed easily with a Mr. Clean Magic Eraser and a little elbow grease.


I still need to paint the hearth, which is Phase II of this project. I've been eyeing up herringbone and chevron patterned marble mosaics on Pinterest, 

From Here
From Here
but I did not want to deal with all of the cutting that would be involved in this small project, so I decided to try and faux paint it like this example

From Here
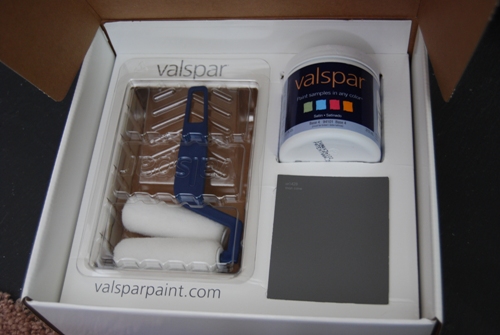
and this is where the free paint comes in. I was able to cash in on Valspar's March free paint sample offer and got an adorable little kit with a sample of Man Cave (a nice, dark charcoal color), a mini paint tray and roller with two covers, a $5 off coupon, a flyer with some of their new color collections and some sample chips of colors they suggest will coordinate with Man Cave - the two tans they suggest are actually very close to my wall color, so I think I'm on the right track.


I'll use my trim color or other miscellaneous white I have around as the base and do the marbling with the Man Cave and another lighter gray and I think hand paint in the grout lines maybe using a mix of the two grays for a medium tone or maybe going lighter. Stay tuned.

I'm linking this to Thrifty Decor Chick's Spring Spray Paint Party. Stop over and see all the great paint projects!

Tuesday, August 2, 2011

The Pinterest Challenge: Or I Can't Stop Staring at My Shelves


Have you ever finished a project and been so in love with how it turned out that you just couldn't stop running out into the room to look at it?


That's how I feel about my newly fabric backed built-ins which were inspired by these pins I'd saved to Pinterest, and thanks to the Pinterest Challenge: Summer Edition, cooked up by Sherry, Katie, Emily and Lana, I had just the motivation I needed to get this simple project done and crossed off my list.

 
(Source)                                                 (Source)

I'm on a mission to introduce more color into my living room and the natural place to start was the bookshelves, since they're a focal point of the room and the first thing I see when I walk in the front door.


I thought about painting the backs, but the shelves are fixed and I really didn't want to do all that taping and cutting in. I'm lazy that way. Then I remembered some fabric I had purchased for a different project that I changed course on. I do that a lot. Change my mind that is. And buy supplies for projects I never get around to. The fabric miraculously was the perfect aqua blue color to go with the odd greenish chairs I was making over, and the print, a small-scale Moorish tile pattern, blended with the larger scale lattice on the chairs too.


The fabric wasn't wide enough to cut lengthwise and cover both sets of shelves, so it was more economical to turn it width-wise, but I knew that would leave me a little short too. No worries, Jo-Ann still had it in stock so I grabbed another two yards (I wanted some extra for pillows too). I don't know the print name - it is part of their Keepsake Calico collection and found on the back wall along with all the other quilting fabrics and is exclusive to them.

I cut the fabric a little wider than necessary (so I thought, it's pretty close in some places) and there are little gaps behind the shelves and to the sides, so I just fed the fabric down behind and tucked in the sides using a piece of cardboard. This was so much easier than the starching I've seen people do to adhere fabric to walls like wallpaper or cutting individual panels and wrapping it around cardboard or foam core (plus it allowed me to keep the fabric in long lengths in case I ever want to do anything else with it.)


I was going to attach it with white thumbtacks, but the backing was too hard (is this were I add a "that's what she said" joke?), but I had some stick on velcro (also from the same project I'd changed my mind on) so I just stuck pieces of this in the top corners and stuck it right on the wall (side note: if you run out of mustache wax, this stuff will totally work - i.e. don't stick it on your face while you need both hands free to do something else). Because the fabric was a little short I had to pattern match and piece in a little more length. I had a little tutorial and photos planned on how to do this, but the cable for the camera that I took the pictures with is at work, so I'll do a separate post on that next week. I only lined the top five shelves - since the bottom three are pretty well covered with books, I didn't think it was necessary to do them.


So that's it, my easy, peasy project that I should have done a long time ago. So thanks ladies for the little nudge.

I'm also linking this to Thrifty Decor Chick's Before and After Party:


Wednesday, July 27, 2011

Viva la France!


Yes, I'm well aware that Bastille Day has come and gone, but with the heat wave we were experiencing here over the last few weeks, getting outside to finish up a spray paint project just wasn't going to happen. And the project I needed to finish was my fleur de lis sconces. They were a thrift store purchase (of course) - I think $3 for the pair, maybe $4 - as a self-proclaimed Francophile, I couldn't leave "ces bébés" behind. They were shiny brass and the arms were loose (no biggie to tighten up with the screw on the back).


After scuffing them up with sand paper, I put on a coat or two of Rustoleum's Heirloom White,


but decided it was too bright and shiny to go alongside the antique white picture frame I planned to flank with them, so I changed course and went with the oil rubbed bronze I had left over from the sunflower mirror makeover.

So here they are, finished and hung. One down, 19 to go.


Pssst. I'm linking up to Between Naps on the Porch's Metamorphosis Monday blog party. Hope on over and take a look at all the inspiring projects.


Monday, April 25, 2011

One Thing Leads to Another

Gallery walls aren't exactly big news or even anything new - heck, my grandmother had one in her family room going back as long as I can remember - probably installed in the 60s or early 70s. But I had a big wall to fill and was tired of looking at pictures sitting around and propped up against stuff so I got over my fear of commitment and started hanging some stuff.


I think part of my hesitation was that I'm really not in love with any of this art, except the two small oil paintings which my Dad painted when he was a teen, but it goes with the Pottery Barn look of the rest of the room and the mix of gold, antique white with gold and natural frames goes with some of the other elements in the room - the oiled bronze curtain rod, lamp, cabinet hardware and ceiling fan, wrought iron on the chairs, antique brass door knob, and some other gold and white and gold frames, so for now it was the easiest solution. I'd like to update and modernize the entire room but there are so many other things on my list I don't see it happening any time soon, so for now I'm working with what I have.

I started out by laying the frames out on the rug to get an arrangement I liked. In addition to the similarly toned frames most of the pictures are architectural in nature with a few landscapes and the one woman, but her colors are similar to the two Italian-looking prints so I think it still works. I also threw in a gold glittery key (Christmas ornament from WalMart) to fill in some space.


Once I had an arrangement I liked, I made newspaper templates - usually I just eyeball it and do pretty well that way with smaller arrangements (I did the mirror and plates over my dresser by eye) but this was the most complex arrangment I've tried so I decided to actually measure and plan. I layed each frame on a piece of paper and just roughly cut around it, it wasn't exact or straight. I hung it on the wall, trying to keep the straight edges at the top and where I needed the frame to line up with another. I didn't bother with templates for the smaller pieces, figuring I could eyeball those once the big stuff was hung. I measured down from the top of the frame to the wire and then measured on the paper and marked an "X" - I use picture hooks rather than nails, so I just made sure I put the bottom of the hook at the "X" and not the nail.


I hammered everything in and carefully tore the paper away and hung everything. To do the key I just used small finishing nails in between some of the details. If you look carefully you can see them, but they're not immediately obvious.


I used this technique in my old bathroom to hang a small washboard and at work to hang a bunch of old saws  - nothing has ever fallen off but if you have kids you may want to look for a better way to attach stuff.


So once I had everything in place I rearranged a bit on the console table, which is currently covered because the Furry Ones have scratched it all to heck and refinishing it is also low on the list. Again, I think it works for the current style of the room which I call early Pottery Barn meets Tuscan villa.


Now, as far as the "one thing leads to another" - what I've worked very hard to hide in the above photos is the corner of the room to the left. My old stereo system is there - yes, I've had it since college, yes, it is huge, no I'm not so old as to have ever owned an 8-track. But it works and I don't have time to convert everything to digital so there you have it. You can see a small bit of it in the below photo. 


It was angled in the corner, but the Boy Cat kept jumping down behind it so I had to pull it out for him to get out and after a few times of doing that I just left it all askew. So while I was prettying this side of the room I decided to pull it out altogether and put a chair in that corner. Then I added the iron tree on the side wall (I'm working on my family's genealogy so I have an idea to personalize that, when I get around to it). Then I added an old baker's rack I was planning to use outside this summer, but I think I like it there for now so I tossed some stuff on the shelves that show and will add some stuff to the lower shelves, when I get around to it.


So, I'm really happy with how this side of the room has turned out. And I can't show you the other side right now.

I'm linking up to DIYbyDesign's Swing into Spring Party. Come take a look at all the great ideas for spring.

Related Posts Plugin for WordPress, Blogger...