Showing posts with label bathroom. Show all posts

Monday, January 30, 2012

Just Kickin' Around

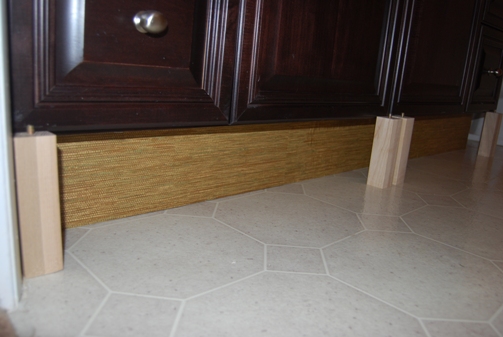
I finally got around to doing a small upgrade to something that's been bugging me about my master bathroom. I have a dark, espresso vanity but the toe kick area underneath is blond and always looked unfinished to me the way the side pieces were constructed. The previous owners bought it on deep discount when they did some upgrades for sale, so I don't know if it was missing a piece or what, but I can see it clearly when I'm laying in bed an it just bugs me.

I had all the supplies I needed on hand - a roll of grasscloth-look wallpaper I'd picked up at a thrift for $3, a can of wallpaper primer picked up at the Habitat for Humanity ReStore, also around $3, some foamy brushes, painters tape, a sanding block, and a wide plastic scraper.


I've never wallpapered anything before and never used the primer, so I was kind of surprised by its appearance - I don't know why but I expected white. The can said it was fine if it froze and thawed which I thought was a possibility because of where it came from, and the can didn't look to old or anything, so I assume it is supposed to look like this.


I followed the instructions for paneling, since that was as close to the surface I was dealing with as the instructions came. I did a quick sanding with the sanding block, wiped the dust off and taped off the floor with painting tape and a few pieces of copy paper.


The primer went on clear so it was hard to see where I had applied it and where I hadn't, but I  could sort of go by feel. While it was drying, I cut my strips of wallpaper to size and after the primer dried the recommended two hours, I soaked the wallpaper strips in the sink for 15 seconds per the directions and then smoothed it on with the plastic scraper. The first piece didn't stick very well (I think I had it rolled too tight when I soaked it and it didn't get wet enough on one end) so I just peeled it back and sprayed it with a spray bottle. The direction said there was no repeat, but the seams are slightly visible. Because of the location they are not obvious, but if I used it on the backs of a bookcase or something I'd want to get it lined up better.

After it dried over night, I cut off the excess along the top with a utility knife, and voila - a much more finished appearance with about 30 minutes worth of work (not counting drying time).


I have some parsons legs I bought for another project that I changed directions on, so if I can figure out how to get the screws out or sawn off I plan to stain those dark and put them under there to give more of a furniture appearance. That should happen, oh, sometime in the next decade or so.


Tuesday, May 17, 2011

Smurfy Gets a Friend


Good friends are hard to find. Square picture frames larger than 12" are even harder to find. You may remember when I first spray painted my ugly brown thrift store candlestick Smurfalicious blue I wasn't sure if I was really on board with the color or not. My master bathroom color scheme was an extension of the bedroom - aqua blues, sand, dark brown wood - and as a windowless space, it was kind of blah. I thought the brigher blue candlestick might help perk things up in there, but the only thing it sort of matched was a blue glass bottle on top of the cabinet. So when I came across this pretty turquoise blue, brown, white, and kelly green silk scarf on a recent thrift store outing I thought it might just do the trick. It was approximately 21" square - yeah, just try to find a picture frame that big without going the custom framing (i.e. mucho expensivo) route. Determined to make it work, I settled on a 12" square with a chunky, dark brown frame. Why the heck are picture frames so darn expensive anyway? Did you know half of them aren't even wood anymore? So $20 for a plastic frame, which Michaels had on sale for 40% off and then I had a coupon for another 25% off, so it came in at just under $10 - fine for one frame, but ouch still a lot if you're planning a gallery wall.

Now obviously my 21" square scarf was not going to fit into a 12" picture frame, and I didn't want to cut it, so, using the backing as a guide, I folded the edges under and ironed them flat. Ta dah! Perfect fit.


The old bathroom art was two photographs I had taken in Charleston, SC back in the days before digital photography. I scanned them and printed them on my ink jet printer, and while I still love them, the ink was beginning to fade and I was getting tired of the frames. I'm considering a photo gallery in the hallway, so they may be reprinted and repurposed there at some point. Because I was replacing two pieces of art with one, I did have to move the hook to hang somewhere in between where the old pieces were originally positioned.


I also wanted to try to work in the green sunflower mirrors I'd used on my Easter table. You may remember they were anti-freeze green and very, VERY plastic, so I spray painted them with Krylon oiled bronze spay paint which was only $2 at Walmart. I have no idea why it was so cheap, all the other colors were more. Because of the smooth, plastic surface I primed with Zinsser B.I.N. Primer, which I'll also be using when I get to a pair of caned chairs with a lacquered finish that are high up on my list for a makeover - it was $8, yikes. If I didn't need it for the chairs I wouldn't have spent that on these cheap-o little mirrors.

Once I had the frames painted and the mirrors back in I played around with the placement a little and finally settled on one underneath the scrarf and slightly off center and one centered above. I arranged Smurfy, a green glass jar, and a metal tin on the back of the tank (why can't they make this perfectly level?) and with the scarf to tie everything together I am much happier with the candlestick's makeover now and I like the brighter colors in the bathroom so much I'm thinking of dying my towels a brighter blue too.


So there you have it, a little spray paint, a little ingenuity, and probably around $20 netted a much bigger and brigther impact for this small space.

I'm linking up to Thrifty Decor Chick's "Home May'd Spray Paint Party." Jump on over and check out everyone's great projects.


Sunday, March 13, 2011

Fun with Photos

I've finally gotten to trying to figure out how to use the manual settings on my camera - and while I'm starting to understand a bit more about how to make the adjustments, I'm still not great with knowing what to set them at. I used to know all of this a million years ago with a film camera and am determined to keep practicing, but I do hope with even a bit of day light to be able to get some better shots.

Here is an updated version of my Smurfalicious candlestick which lives in a windowless bathroom:


And the color is definitely looking much more accurate than before. Mastering this should come in handy with my eBay photos too.


Tuesday, March 8, 2011

It's Smurfalicious!


I did a quick makeover of the thrifty candlestick I told you about here using Rustoleum spray paint in Lagoon. I love the ease of spray paint, but sometimes the selection of colors isn't that great. This came out just a tad brighter than I was really looking for - I think I needed something with a bit more gray in it to tone it down just a bit, but it isn't a bad match with a small blue glass bottle I have in there too so I'll most likely leave it for now - it is certainly way better than what I started with, which  you may remember was a bad, streaky brown.


I'm still wanting to wallpaper the ceiling because the room is kind of blah without much color, so I'll try to tie it in that way, and if not, well, it is easy and cheap enough to repaint.

I could not get accurate color in my photos and the swatch from the Rustoleum site wouldn't copy over, so here is a close approximation of the color.


I also lucked into a brand new, still in the wrapper pillar candle at one of my favoirte thrifts for $1.40. Originally I was thinking of a shorter one, but I'd just spent a crazy amount on fake, battery operated candles for the fireplace and the dollar store didn't have anything, so I was happy to get such a deal on this and now that I see it put together, I do like the taller size. 

Wednesday, January 26, 2011

Make Room for Kitty


Chloe


Quincy


While I certainly don’t believe you should take on a pet you’re not 1001% committed to, I know a lot of people whose only stumbling block for a cat is the issue of where to put the litter box. With a little creativity, this problem can be solved quite easily and quite stylishly.

Currently I’m fortunate to have a second full bath that is not needed for showering, so my solution is very easy: I just put the two litter boxes right in the tub. I know eventually my guys will get too old to jump in there, at which point if we’re still living here I will most likely trade bathrooms with them so they can get in and out of the lower shower stall, but for now they are hidden away behind the shower curtain where no one can see and all the litter they scratch out is contained within the tub instead of all over the carpet. I keep a stopper in the tub and use the vacuum cleaner to suck up the stray litter when I do a full box cleaning so it doesn’t harm the plumbing.


Now you see it...

Now you don't.
In addition to the litter boxes, I’ve placed a pole across the built in niches in the shower wall and use this to suspend their carriers. The scoop goes in another niche and I’ve hung some volcanic rocks from the shower head that are supposed to absorb smells (jury is still out on this, they don’t work instantaneously). I should probably hang this with some sort of cute ribbon or something a little more classy than an old dry cleaner's hanger, but I just got it and haven't had time to really think about it much.

De-Stinkifier.
I’ve decorated the space with random cat-themed tchotchkes, plus a few cute little birdies (this is “their” room after all and they’re not really big fans of random cats, they barely tolerate one another), and their pictures (well, I only have Mia’s picture up currently, still need to get the frames painted for the other two).


Random cat decor.

Birdies for the kitties.
The space under the sink holds bags of litter, dry cat food (for some reason they prefer to eat their dry food in here rather than in the pantry where they get their wet food and where we also keep bowls of dry food and water), paper bags for the litter box scoopings, and old towels and pillow cases for in their carrier and for cleaning up after them.


Supplies store neatly under the sink.
By the way, I can’t recommend “The World’s Best Cat Litter” enough. It really is. It is made from corn and it clumps, but not into a hard little cement ball (remember, your cat is going to breath in and most likely consume some of their litter in cleaning themselves – I personally don’t want anything turning to cement inside of them); it doesn’t get gummy; and it is chemical free. It is not the cheapest litter but I can go a month without doing a full change out.

A cute milkglass planter in the medicine cabinet holds their nail clippers, brush, collars they won't wear and some of their other small items.


Even the hand soap has a cat on the label.


Before moving here, we lived in a one bed, one bath apartment so my solution for the litter box was a bit different. I removed the doors from the bathroom vanity and put one of the litter boxes in there and then covered it with a tension rod and a small curtain I’d made to coordinate with the shower curtain. As for all the junk one normally stores under the vanity, I moved most of it to the linen closet where I hung a shoe bag over the door and used the pockets for spare shampoo, toothpaste and the like (hint: if you do this, get a shoe bag with CLEAR pockets – may not be as attractive, but makes finding things MUCH easier, trust me, I learned this the hard way). For things like spare toilet paper that had to be kept in the bathroom, I just got a few cute baskets and boxes and stored them in those on the floor and on the back of the toilet tank.

The beauty of this idea is that it can be adapted to other spaces. If you don’t want to give up the space in your bathroom vanity or need space for a second litter box, you can remove the door on a linen closet, tv cabinet, buffet or anything like this and make a private little space with a curtain. Just make sure you remove any low shelves so kitty has some headroom and of course you will need to devote the entire cabinet to kitty and kitty’s supplies (no storing dishes in the buffet along with the litter box!)

If you don't want to DIY it, you can also purchase ready-made furniture with a built-in litter box space like this stylish bench from Drs. Foster and Smith.

Specialty cat furniture from Drs. Foster and Smith

Saturday, August 21, 2010

Disguising Shower Doors


Like many master bathrooms, mine has sliding shower doors, which leaves the bathroom pretty plain and cold looking. To add a layer of interest I bought an extra set of curtain panels to match the bedroom ones (I was lucky to get three matching pairs at a thrift store for $8/pair that are just a little darker than my walls and have a delicious sheen and texture). I purchased a tension shower rod in brushed nickel from Walmart and hung it higher than a standard shower curtain to accommodate the 84" length of the curtain panel (a typical shower curtain at 72" would not have been long enough to cover the door and reach all the way to the floor, but it would work if you are ok with the curtain only covering the doors and the white from the shower surround showing at the bottom). I purchased S-shaped shower curtain rings at Target for less than $10/pack and instead of making button holes in the top of the curtain, I just sewed them tightly in place to the front of the curtain.


A trick I use to make the sewing go faster is to double the thread then thread it through the needle, then double again before knotting, so you're sewing with 4 strands each time you pass the needle through the fabric. Using this method I only needed to stitch through twice before knotting off and moving on to the next ring.

Once I had all six rings in place I just hooked them over the rod, and voila! Instant dressiness and camouflage. I'm still contemplating wallpaper on the ceiling to add some color in here because it's still a little beige, but that's a project for another time.


Related Posts Plugin for WordPress, Blogger...